During the onset of winter and the accumulation of snow, a snow blower becomes an indispensable instrument for effectively clearing driveways and walkways. However, to ensure optimal performance of your snow blower, it is of utmost importance to regularly maintain and cleanse its carburetor. This article will provide you with a detailed, step-by-step guide on how to clean a snow blower carburetor. Rest assured, even if you lack mechanical expertise, we will elucidate the process in plain language, making it easily understandable for everyone. Let us commence with the instructions without delay!
Table of Contents
What is a Carburetor?
The carburetor is a vital component of a snow blower’s engine. Its primary function is to mix air and fuel in the right proportions for combustion. Think of it as the heart of your snow blower, supplying the necessary fuel to keep it running smoothly.
Signs of a Dirty Carburetor
Over time, the carburetor can accumulate dirt, debris, and old fuel residue, resulting in poor engine performance. Here are some common signs that indicate a dirty carburetor:
- Starting Difficulty:A dirty carburetor can make starting your snow blower a real challenge. You might find yourself pulling the starter cord repeatedly without success, especially in the biting cold of a winter morning.
- Engine Stalling:If your snow blower’s engine starts but then stalls shortly after, it’s often a sign that the carburetor isn’t delivering the right fuel-air mixture to keep the engine running.
- Reduced Power Output:A clogged carburetor can limit the amount of fuel reaching the engine, resulting in decreased power output. This means your snow blower won’t throw snow as effectively as it should.
- Inefficient Fuel Consumption:A malfunctioning carburetor can also lead to poor fuel efficiency. You’ll find yourself refilling the gas tank more often, increasing operating costs.
If you notice any of these symptoms, it’s time to clean your snow blower carburetor.
Preparing for Cleaning
Before you begin the cleaning process, gather the necessary tools and materials:
- Screwdriver (flathead and Phillips)
- Carburetor cleaner
- Compressed air
- Safety glasses
- Latex gloves
- Clean cloth or paper towels
- Empty container or tray
Make sure you have these items readily available to streamline the cleaning process.
Step-by-Step Cleaning Process
Removing the Carburetor
- Turn off the snow blower’s engine and allow it to cool down completely.
- Locate the carburetor, usually positioned near the engine.
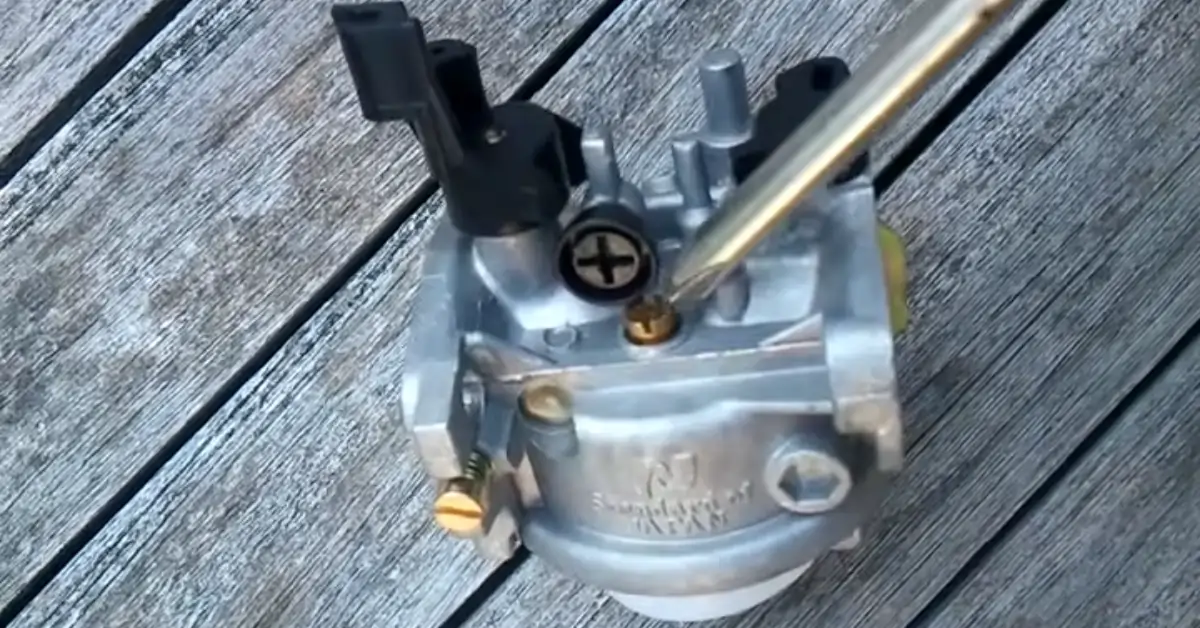
- Use a flathead or Phillips screwdriver to disconnect the carburetor from the engine by removing the bolts or screws.
Disassembling the Carburetor
- Carefully disconnect the linkage and fuel lines connected to the carburetor.
- Take note of the connections to ensure proper reassembly later.
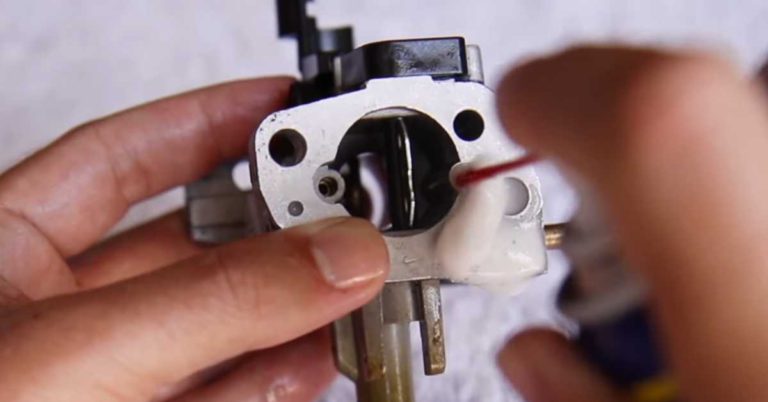
- Remove any additional components, such as the float bowl, throttle plate, or jets, if necessary.
Cleaning the Carburetor Parts
- Spray carburetor cleaner on all the disassembled parts to remove dirt and deposits.
- Use a small brush or toothbrush to scrub away stubborn grime.
- Pay special attention to small orifices, passages, and jets, ensuring they are clear of any blockages.
Soaking the Carburetor in Cleaner
- Fill a container or tray with carburetor cleaner.
- Place the disassembled carburetor parts into the cleaner, ensuring they are fully submerged.
- Allow the parts to soak for the recommended duration specified on the cleaner’s packaging.
Clearing Clogged Passages
- After soaking, use compressed air to blow out any remaining debris from the carburetor passages.
- Ensure all passages are clean and free of obstructions, using the air at different angles if needed.
Reassembling the Carburetor
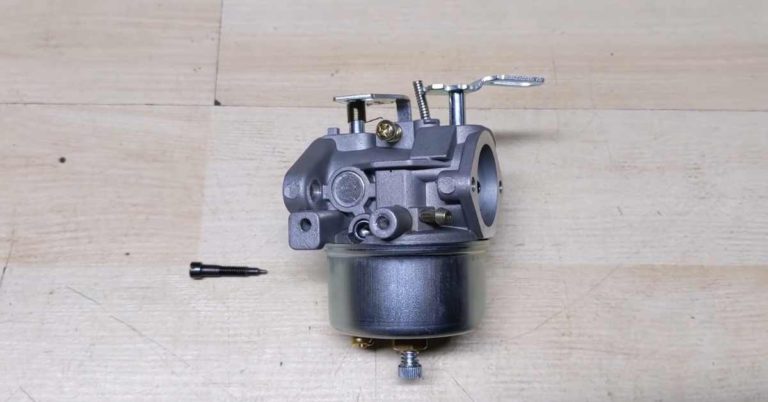
- Take the parts out of the cleaner and dry them thoroughly with a clean cloth or paper towels.
- Carefully reassemble the carburetor, ensuring all components are correctly aligned and in their respective positions.
- Reconnect the linkage and fuel lines, referring to your earlier notes for proper reconnection.
Installing the Carburetor
- Position the carburetor back onto the engine, aligning it with the mounting holes.
- Secure the carburetor in place by tightening the bolts or screws.
Testing and Adjusting
- Start the snow blower’s engine and let it run for a few minutes.
- Check for any fuel leaks or abnormal engine behavior.
- If necessary, adjust the carburetor settings according to the manufacturer’s instructions.
Cleaning the Exterior
While you’re cleaning the carburetor, it’s also a good time to clean the snow blower’s exterior. Wipe away any dirt, grime, or salt residue using a damp cloth or sponge. This not only improves the overall appearance but also helps prevent corrosion.
Carburetor Maintenance Tips
A well-maintained carburetor ensures your snow blower consistently starts and operates at peak performance throughout the winter. To keep your carburetor in top shape, here are some valuable maintenance tips:
- Regular Inspections:Frequent visual inspections can help you identify early signs of dirt or wear in your carburetor. Look for clogs, corrosion, and loose connections. If you spot any issues, address them promptly to prevent larger problems down the road.
- Scheduled Cleaning:Cleaning your carburetor should be part of your snow blower’s regular maintenance routine. The frequency of cleaning may vary depending on usage, but a good rule of thumb is to clean it at the beginning of the winter season and then periodically throughout the season. If you notice performance issues, it’s a good sign that cleaning is needed.
- Fuel Quality:Using clean, fresh, high-quality fuel is essential. Stale or contaminated fuel can leave deposits in the carburetor, leading to clogs and reduced performance. Always use fuel stabilizers and consider using ethanol-free gasoline to minimize carburetor problems.
- Air Filter Maintenance:A clean air filter improves carburetor performance. Regularly inspect and clean or replace the air filter as needed, ensuring that the engine receives the proper air-to-fuel mixture.
- Professional Maintenance:While homeowners can handle many maintenance tasks, it’s wise to schedule professional maintenance annually or as recommended by the manufacturer. Professionals have the expertise and tools to perform in-depth inspections and adjustments that can extend the life of your snow blower and its carburetor.
FAQs
Q: Why is my snow blower’s engine not starting?
A: A dirty carburetor could be the culprit. Follow our guide to clean the carburetor and try starting the engine again.
Q: Can I use any type of carburetor cleaner?
A: It’s recommended to use a carburetor cleaner specifically designed for small engines. Consult the product label for compatibility.
Q: How often should I clean the carburetor?
A: Cleaning the carburetor once per season or every 25 hours of operation is a good practice to maintain optimal performance.
Q: What if my carburetor is damaged or worn out?
A: If the carburetor is severely damaged or worn out, it may need to be replaced. Consult a professional or refer to the manufacturer’s guidelines.
Q: Can I clean the carburetor without removing it?
A: It’s best to remove the carburetor for thorough cleaning. However, you can use carburetor cleaner spray to clean the exterior and visible parts while it’s still installed.
Conclusion
In conclusion, consistent snow blower carburetor maintenance is the key to reliable winter performance. Regular cleaning and upkeep can prevent common problems and extend your snow blower’s lifespan. Don’t wait for issues to arise; take proactive steps to ensure your machine is always ready to conquer winter’s challenges.
4.6/5